

Understanding a magnet’s power might seem simple. It sticks or it doesn’t. But engineers, designers, hobbyists, and suppliers need much more detail. The real question isn’t whether it sticks. It’s how strongly and in what way.
This guide gives you a complete answer to how do you measure a magnets strength. We’ll explore different aspects of magnets strength. You’ll learn about technical lab measurements and practical home tests.
We’ll cover the key differences between pull force and magnetic field strength. This helps you understand which measurement matters for your specific needs. By the end, you’ll know how to properly measure magnet strength. You’ll also be able to select the perfect magnet for any project, from industrial sensors to DIY creations.
Table of Contents
Part 1: Defining "Magnet Strength"
Asking about a magnet’s strength is like asking how “fast” a car is. Do you want its 0-60 mph acceleration? Its top speed? Its engine size? Each number tells a different story.
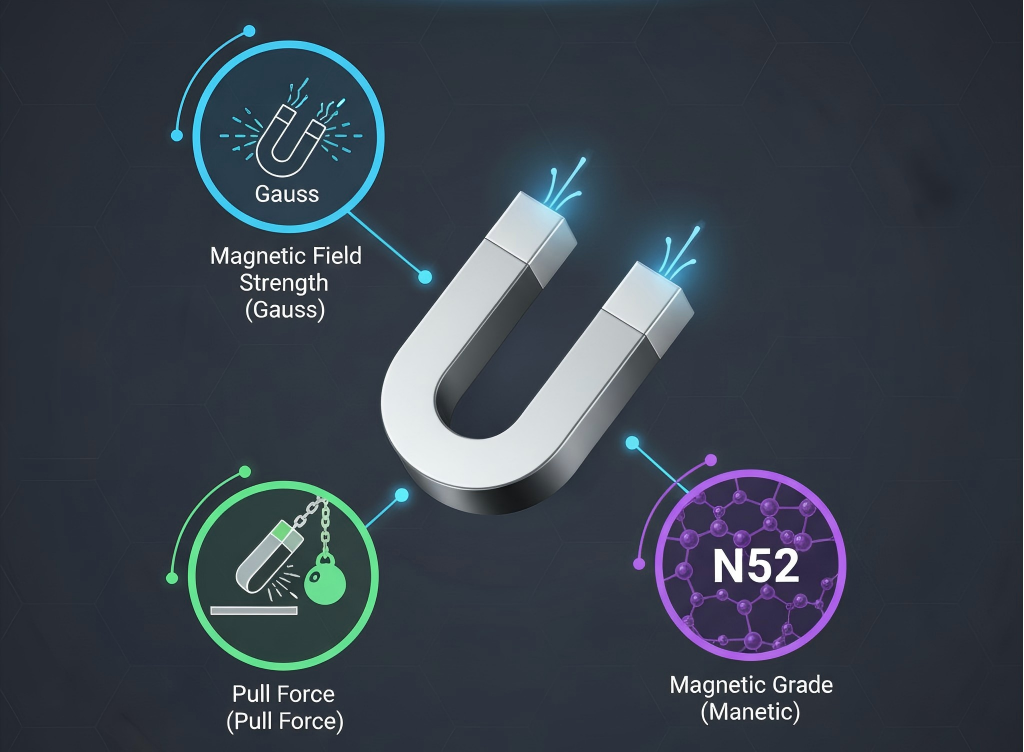
Similarly, magnet strength isn’t one universal number. It’s a complex concept described by three different but related measurements. Understanding these three pillars helps you correctly measure and use magnets.
Three Pillars of Strength
A magnet’s performance comes from its field strength, holding power, and material potential. Each serves a unique purpose in design and application.
The first pillar is magnetic field strength. This is often measured in Gauss or Tesla. It shows the density of the magnetic field at a single point in space. Think of it like a lightbulb’s brightness. The intensity changes dramatically as you move closer or farther away.
The second pillar is pull force. This is measured in pounds (lbs) or kilograms (kg). It’s a practical, real-world measurement. It defines the force needed to pull a magnet straight off a thick, flat steel surface. It’s like a hook’s weight capacity—a direct measure of holding power.
The third pillar is the magnetic grade. This is built into the magnet’s material, like N42 or N52 for neodymium magnets. This grade represents the material’s potential power density. It’s like a car’s engine size. A 5.0L engine has more potential power than a 2.0L engine.
Here’s how these concepts relate:
Metric | What It Measures | Common Use Case |
Magnetic Field Strength | Flux density at a specific point | Sensor activation, scientific experiments, data encoding |
Pull Force | Holding power against a flat surface | Holding, lifting, fastening applications |
Magnetic Grade | The magnet’s potential energy | Manufacturing and material selection |
Choosing the right measurement method depends on what you need the magnet to do. A scientist studying field interactions needs a Gauss reading. Someone designing a magnetic latch needs to know the pull force.
Part 2: Professional Measurement
For engineering, quality control, and scientific research, precision matters. You need repeatable results. Professional-grade instruments provide accurate, certifiable data on magnets strength.
These methods go beyond simple comparison. They generate exact results for product specifications, performance validation, and failure analysis. The two primary tools are the Gaussmeter and the pull-force tester.
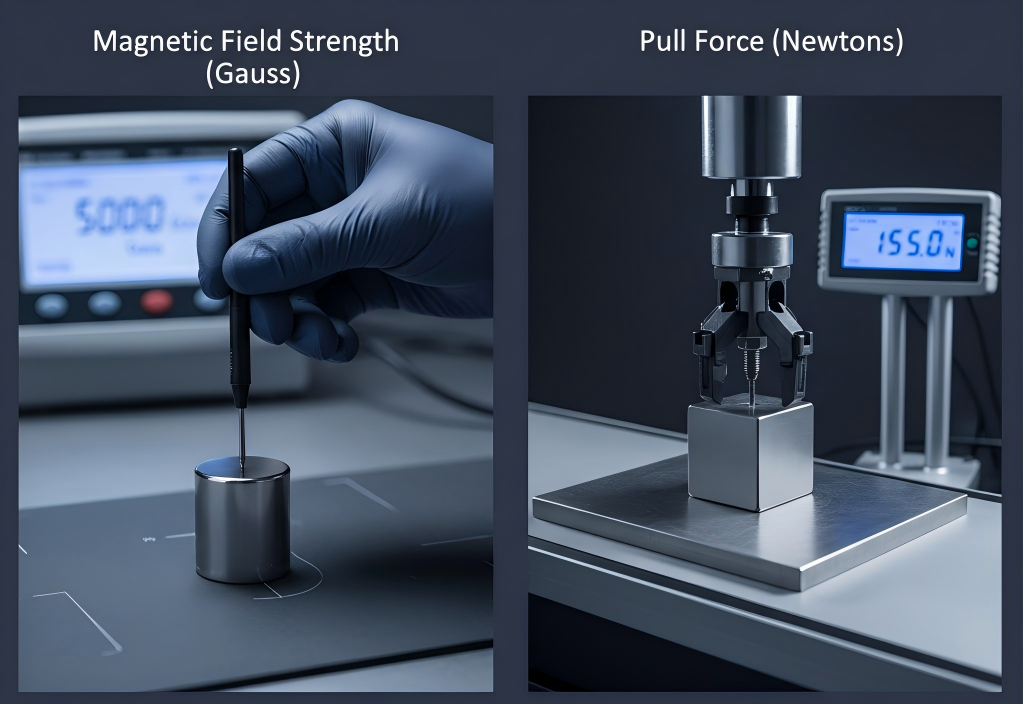
Using a Gaussmeter
A Gaussmeter (also called a Teslameter) measures magnetic field strength precisely. It gives an exact reading of magnetic flux density at a very specific point.
The device uses a Hall effect sensor at the tip of a probe. When placed in a magnetic field, this sensor creates voltage proportional to the field’s strength and direction. The meter converts this voltage into a reading in Gauss or Tesla.
Remember: 1 Tesla equals 10,000 Gauss.
Use a Gaussmeter when your application depends on the magnetic field itself, not just holding force. This is critical for activating Hall effect sensors. It’s also essential for magnetic resonance imaging (MRI), mapping field shapes in motor design, and quality control checks across magnet batches.
Here’s how to take a standard surface reading:
Step 1: Calibration and Setup
First, “zero” the probe. Place it inside a zero-gauss chamber that shields it from all external magnetic fields, including Earth’s. Turn on the meter. Press the ‘zero’ or ‘tare’ button to establish a true zero baseline.
Step 2: Probe Positioning
The reading depends entirely on the probe’s position relative to the magnet. For a standardized surface reading, find the point of maximum strength. This is almost always at the geometric center of a magnetic pole.
For advanced measurements, use different probes. An axial probe measures the field parallel to the probe’s axis. A transverse probe measures the field perpendicular to it. Choosing the right probe is essential for accurate results.
Step 3: Taking the Reading
Hold the probe so its tip is perpendicular to the magnet’s surface. Gently place the tip on the center of the pole face. Move the probe slightly to find the absolute peak reading. The meter’s display shows the surface field strength in real-time.
Step 4: Interpreting the Results
A reading of 5000 Gauss means the magnetic flux density is 5000 Gauss at that exact sensor point. This number drops exponentially as the probe moves away from the surface. This is a key principle of magnetism. For more information on the physics behind this, the Hall effect is well-explained by university resources.
Using a Pull-Force Tester
While a Gaussmeter measures an invisible field, a pull-force tester measures physical force. It determines how much force is needed to detach a magnet from a standardized steel plate.
This is the most important magnet strength measurement for holding, lifting, or fastening applications. It directly answers, “How much can this magnet hold?” It’s used to rate lifting magnets, magnetic latches, mounting magnets, and consumer products.
The test setup is as critical as the instrument itself.
Step 1: The Test Setup
Industry standard pull-force testing requires a thick, flat, clean, unpainted low-carbon steel plate. The plate must be much thicker than the magnet to prevent magnetic saturation, which would limit holding force.
Any change—a thinner plate, paint layer, uneven surface, or air gap—will reduce the measured pull force. This commonly causes differences between rated strength and real-world performance.
Step 2: Applying the Magnet
Carefully place the magnet at the center of the test plate. Make sure it sits perfectly flat with no debris underneath. The tester’s fixture (including a force gauge or load cell and a hook or clamp) attaches to the magnet.
Step 3: Applying Force
The testing apparatus applies separating force perfectly perpendicular to the steel plate. The force increases slowly and steadily. Applying force at an angle (shear force) would give a much lower reading.
Step 4: Recording the Peak Force
The force gauge continuously measures applied force. When the magnet breaks free from the plate, the gauge records the maximum or “peak” force achieved. This peak value is the magnet’s pull force. Following standards from organizations like the Magnet Materials Producers Association (MMPA) ensures consistent, comparable tests.
Part 3: DIY & Low-Cost Methods
You don’t always need expensive equipment to understand a magnet’s strength. For hobbyists, students, and DIYers, several low-cost methods provide excellent relative comparisons.
These DIY magnet tester methods are perfect for sorting unlabeled magnets or comparing different types. They won’t give you precise Gauss or pull force values. But they’re highly effective for practical, hands-on evaluation.
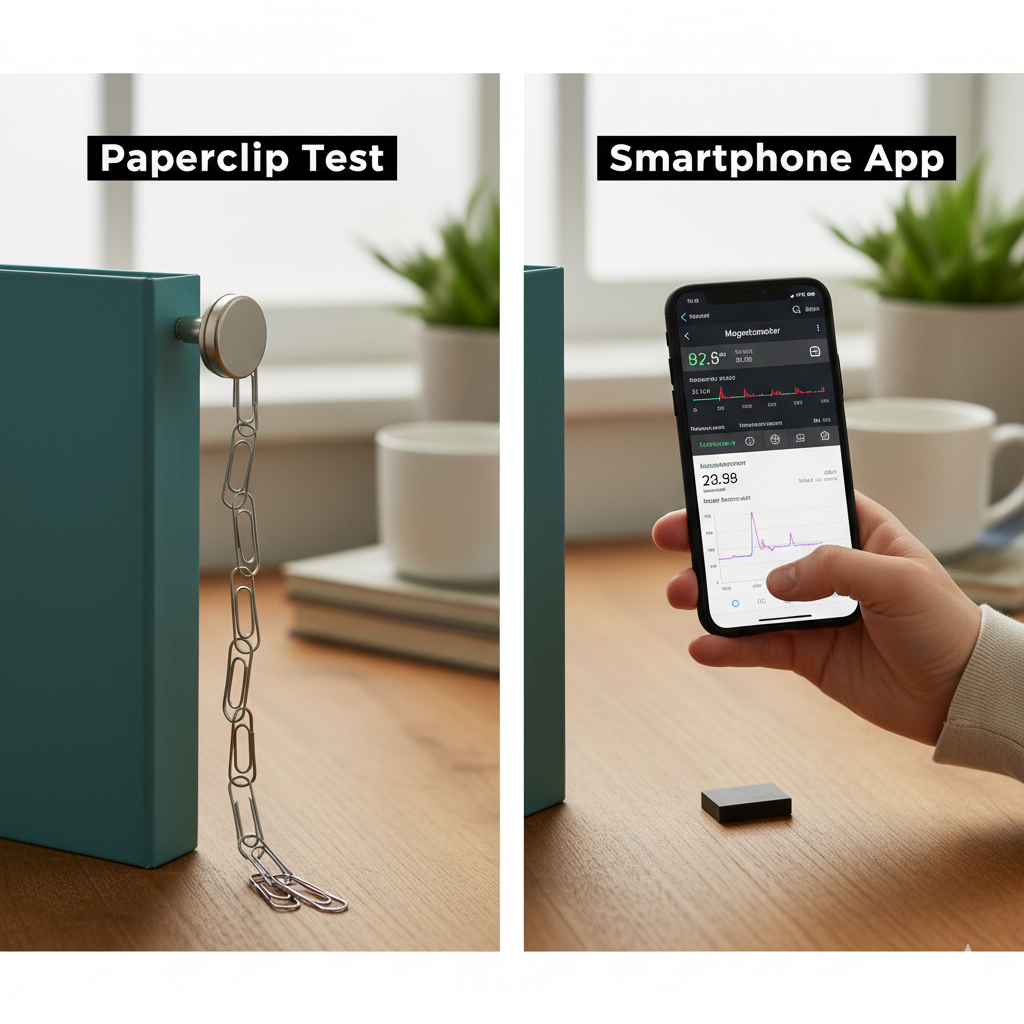
The Paperclip Test
This is the most classic method for comparing relative pull force. It’s simple, visual, and uses common office supplies.
Take a box of identical paperclips. Consistency is important for fair comparison. Straighten one paperclip to act as a primary hook.
Attach the magnet to a stable, non-magnetic overhead surface. Hang the straightened paperclip from the magnet.
Add more paperclips one by one to create a chain. Continue until the chain’s weight overcomes the magnet’s force and falls.
The number of paperclips the magnet holds is your relative strength score. A magnet holding 15 clips is demonstrably stronger than one holding 10.
Using a Smartphone
Most modern smartphones contain a built-in magnetometer. This is the same sensor that powers the digital compass. With the right app, you can turn your phone into a portable magnetic field detector.
Download a sensor-reading application from your phone’s app store. Apps like “Physics Toolbox Sensor Suite” are excellent choices. They display raw sensor data.
Open the app and navigate to the magnetometer function. Before starting, hold the phone far from any magnets or metal objects. See the baseline reading, which is Earth’s magnetic field (typically 30-60 microteslas, or µT).
Slowly bring a magnet toward your phone. You need to locate the sensor’s position, often near the top edge of the phone. Watch the total magnitude reading increase as the magnet gets closer.
This method is fantastic for visualizing how magnetic field strength changes with distance. You can compare different magnets by bringing each to the same fixed distance from the sensor and noting the µT reading. A stronger magnet produces a higher reading.
Always be cautious. Extremely strong neodymium magnets can potentially damage a phone’s internal components. Perform this test carefully and avoid direct contact with very powerful magnets. For your projects, you might be testing different types of magnets. Learn more about the properties of Neodymium vs. Ferrite Magnets on our blog.
The Compass Deflection Method
This experiment uses a simple magnetic compass to compare field strength of different magnets at a distance. It’s a great visual demonstration of magnetic fields.
Place a standard hiking or orienteering compass flat on a wooden or plastic table, away from any metal. Let the needle settle so it points to magnetic north.
Use a ruler to measure a set distance from the compass edge, for example, 12 inches. Place your first magnet at this mark with its side facing the compass.
The magnet’s field interferes with Earth’s magnetic field and causes the compass needle to deflect or turn away from north.
Using a protractor placed under the compass, measure the deflection angle. Note the angle.
Remove the first magnet and replace it with a second magnet at the exact same 12-inch distance. Measure the new deflection angle. The magnet causing greater deflection has a stronger magnetic field at that distance.
Part 4: Connecting to Your Application
Understanding how do you measure a magnets strength is only half the battle. The crucial next step is connecting that measurement to your specific application needs. The “strongest” magnet isn’t always the best one.
The right metric—Gauss, Pull Force, or Grade—depends entirely on the magnet’s intended job. Choosing the correct magnet saves time and money. It also ensures your project or product performs as designed.
For Engineers and Designers
For professionals in engineering and product design, precision is paramount. Your choice of metric depends on the magnet’s function within a system.
If you’re designing a system using a Hall effect sensor, reed switch, or another magnetic sensor, the critical metric is magnetic field strength (Gauss) at a specific distance and location. You need to ensure the field is strong enough to trigger the sensor across a defined air gap.
For applications like electric motors, actuators, and generators, the magnet’s intrinsic properties matter more. Here, you’ll be concerned with the material’s magnetic grade (e.g., N42, N52) and its full B-H curve. This describes how the material behaves under magnetizing and demagnetizing forces. This data, especially how it changes with temperature, is vital for performance simulations. You can find detailed explanations of B-H curves on engineering resource sites.
For Suppliers
For e-commerce businesses and industrial suppliers, customer communication is key. Your customers are most often concerned with holding applications.
Therefore, pull force is the most valuable and easily understood metric. When a customer asks “how strong is this magnet?” they usually mean “how much can it hold?”
Clearly list the pull force in pounds or kilograms. To build trust and authority, also specify the exact test conditions used to obtain that rating (e.g., “Rated Pull Force of 25 lbs measured on a 1/2″ thick, flat steel plate”). This transparency manages customer expectations and prevents disputes. Providing clear specifications is key. If you need magnets with certified strength for your products, explore our Custom Magnet Solutions.
For DIY Makers
Makers and hobbyists work on a wide variety of projects. Each has different magnetic requirements.
For most general-purpose DIY tasks (workshop tool holders, magnetic clamps, or refrigerator magnets), estimated pull force is the most useful metric. You can use the paperclip test or a simple spring scale to get a good idea of holding power.
For more advanced projects like building a small wind turbine, brushless DC motor, or magnetic levitation device, understanding relative magnetic field becomes more important. Here, using a smartphone magnetometer or compass deflection method can help you select and orient magnets for maximum efficiency.
For Students and Educators
In educational settings, the primary goal is demonstrating scientific principles clearly and visually. The absolute values of magnets strength are less important than the concepts they illustrate.
The DIY methods are perfect for classroom demonstrations. The compass deflection experiment excellently proves that magnetic fields exist and visualizes how their strength diminishes with distance, illustrating the inverse square law.
Using a smartphone magnetometer allows students to collect real data, plot graphs of field strength vs. distance, and map field shape around a magnet. These hands-on experiments are far more engaging than textbook diagrams. Many science education websites offer experiment ideas that can be adapted for the classroom.
|
Application
|
Most Important Metric
|
Why?
|
|
Magnetic Sensor Activation
|
Magnetic Field (Gauss)
|
The sensor triggers at a specific field density.
|
|
Lifting & Holding
|
Pull Force
|
Directly measures the holding capacity.
|
|
Electric Motor Design
|
Magnetic Grade / B-H Curve
|
Determines the motor’s efficiency and power.
|
|
Classroom Demonstration
|
Relative Field Strength/Shape
|
The goal is to visualize and compare magnetic principles.
|
Part 5: Choosing with Confidence
We’ve established that “magnet strength” isn’t one-size-fits-all. It’s a combination of magnetic field strength (Gauss), practical holding power (Pull Force), and intrinsic material potential (Grade).
The best way to measure a magnet’s strength depends entirely on your goal. A Gaussmeter is essential for sensor applications. A pull-force tester is required for holding applications. Simple DIY tests are perfect for comparison and education.
By understanding these distinctions, you can move beyond simple attraction and start evaluating magnets like an expert. You’re now equipped to interpret specifications, perform meaningful tests, and choose the right magnet with confidence.
A final, crucial note on safety: high-strength neodymium magnets are not toys. They’re powerful enough to cause serious pinching injuries. They can also shatter on impact, sending sharp fragments flying. Keep them away from pacemakers, electronic devices, and magnetic media like credit cards. Always handle strong magnets with care and respect their power. For comprehensive guidelines, refer to official magnet safety warnings.
Whether you’re designing a complex industrial assembly or choosing a magnet for your next DIY project, understanding these principles is key. If you have specific requirements or need help selecting from our wide range of high-performance magnets, our team of experts is here to help.
Browse our full inventory or contact us today for a custom consultation.
We are a manufacturer specializing in the research and development of magnets with years of industry experience. Our product offerings include NdFeB magnets, ferrite magnets, and custom magnetic components. Our goal is to provide high-quality magnetic solutions to customers worldwide, and we also offer OEM/ODM customization services. If you have any questions about magnets or custom applications, please feel free to contact our team of experts.
Facebook
Twitter
LinkedIn
WhatsApp