
Unwanted magnetism creates real problems in precision work. It makes tiny metal shavings stick to cutting tools. It messes with sensitive lab measurements. It can even disrupt the delicate parts inside a watch.
The problem is clear. You need to remove magnetism from a metal part. And you need a method that works without damaging the component.
This guide gives you a complete, practical overview of demagnetization. We’ll start with simple techniques and work up to industrial solutions. Along the way, we’ll explain the science and show you specific applications for each method. Our goal is to help you choose and use the right approach for your task.
Here’s what you’ll learn:
- The basic science behind magnetism and how to remove it.
- Four main methods for permanent demagnetization.
- Practical solutions for temporarily blocking a magnetic field.
- A decision guide to help you pick the perfect method for any situation.
- Important safety rules to protect you and your equipment.
Table of Contents
The Science of Magnetism
To effectively demagnetize a material, you first need to understand why it becomes magnetized. The answer lies in its microscopic structure. This isn’t just theory. It’s the foundation for troubleshooting and picking the best demagnetization technique.
Magnetic Domains Explained
Materials like iron, steel, nickel, and cobalt contain countless tiny regions called magnetic domains. Each domain is basically a microscopic magnet with its own north and south pole. In an unmagnetized piece of metal, these domains point in random directions.
Their magnetic fields cancel each other out. The result is a material with no overall external magnetic field.
The Magnetization Process
When you expose these materials to a strong external magnetic field, something changes. The external field pushes on the magnetic domains, making them rotate and line up in the same direction.
Think of a crowd of people all turning to face the same stage. Once enough domains align, their individual magnetic fields combine. This creates one larger magnetic field, and we say the object is now magnetized.
The Goal: Creating Chaos
Demagnetization reverses this process. We need to put enough energy into the material to break the forces holding the magnetic domains in line.
By supplying the right kind of energy, we scramble the domains. We force them back into their original random orientations. When the domains are mixed up again, their individual fields cancel each other out. The material returns to a magnetically neutral state. All the methods we’ll discuss are just different ways of creating this controlled chaos.
Method 1: Thermal Demagnetization
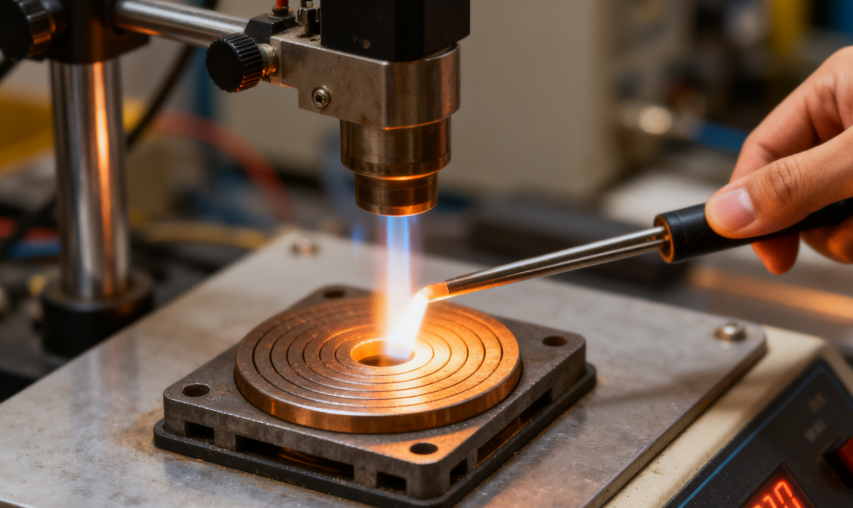
One of the most complete ways to demagnetize a material is by heating it. This method uses a basic property of magnetic materials and provides total demagnetization. But it comes with serious and often permanent consequences.
Exceeding Curie Temperature
Every magnetic material has a specific temperature called the Curie temperature or Curie point. When you heat a material above this critical temperature, the intense heat provides more than enough energy to completely scramble the magnetic domains.
At this point, the material loses its magnetic properties and becomes paramagnetic. As long as it stays above the Curie temperature, it can’t hold a permanent magnetic field. If you then cool it in a magnetically neutral environment (away from strong fields, including Earth’s), it will stay demagnetized.
Here are the Curie temperatures for several common materials.
Material | Curie Temperature (°C / °F) |
Iron | 770 °C / 1418 °F |
Nickel | 358 °C / 676 °F |
Cobalt | 1131 °C / 2068 °F |
Steel (varies) | ~727 °C / ~1340 °F |
Step-by-Step Process
Using heat for demagnetization is a serious industrial process. It requires proper equipment and safety protocols.
- Safety and Preparation: This process involves extreme heat. You must do it in a controlled environment like a furnace or forge. Use appropriate protective equipment, including heat-resistant gloves, apron, and face shield. Make sure the area is free of flammable materials.
- Controlled Heating: Heat the object evenly past its specific Curie temperature. The entire part must reach this temperature, not just the surface.
- Controlled Cooling: Once you exceed the temperature, cool the object in a magnetically neutral environment. This means keeping it away from any permanent magnets or strong electrical currents. For best results, cooling should happen in a space shielded from Earth’s magnetic field.
Pros, Cons, and Best Uses
This method is powerful but highly specialized. Understanding its trade-offs is critical.
Pros:
- Extremely effective, capable of near-total demagnetization.
- Works on materials of any size or shape, as long as you can heat them evenly.
Cons:
- Permanently changes the metal’s properties, such as hardness, temper, and grain structure.
- Carries significant safety risks, including severe burns and fire hazards.
- Uses a lot of energy.
- High risk of warping or deforming the part.
Best For: Bulk raw materials or components where metal properties aren’t critical or where you’re already planning heat treatment. Completely unsuitable for finished precision parts, hardened tools, or heat-sensitive components.
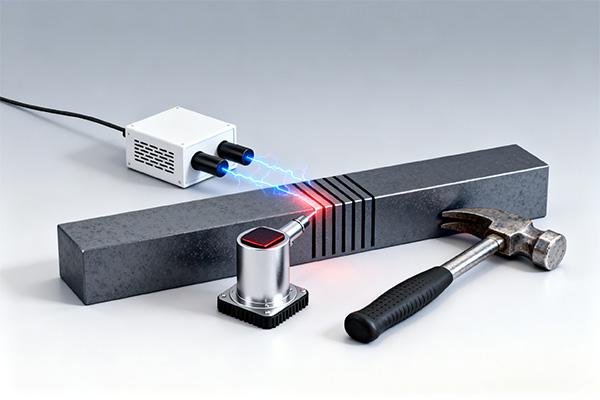
Method 2: Mechanical Demagnetization

The simplest and most accessible method for weakening a magnetic field is to apply mechanical shock or vibration. This technique needs no special equipment but offers the least control and carries the highest risk of damage.
Disrupting Domains with Force
Just as heat provides thermal energy to scramble magnetic domains, a sharp impact provides kinetic energy. Hammering a magnetized object can physically jolt the domains out of alignment. This causes a reduction in the overall magnetic field.
The energy from the impact creates shockwaves that travel through the material’s structure, disrupting the uniform orientation of the domains. However, this disruption is often incomplete and uncontrolled.
How to Demagnetize by Striking
If you choose this method, proceed with extreme caution. We consider this a last-resort option for non-critical items, like an old screwdriver or hammer that has become annoyingly magnetized.
- Safety First: Always wear safety glasses. Striking hardened steel can cause it to chip or shatter, sending sharp pieces flying.
- Orientation: To minimize Earth’s magnetic field influence, orient the object in an East-West direction. Placing it North-South can cause it to be slightly re-magnetized by Earth’s field during the process.
- Striking: Place the object on a sturdy, non-magnetic surface like a wooden workbench. Strike it firmly but carefully with a non-magnetic hammer (like brass or plastic) or use a standard hammer on a buffer piece of wood. Rotate the object and strike it from different angles.
- Verification: Check for remaining magnetism with a compass or by seeing if it still attracts small steel items. The effect will likely be a reduction, not complete removal, of magnetism.
Why This Is Rarely Recommended
For any professional or precision application, we strongly advise against this method. The drawbacks are severe and often outweigh any potential benefit.
- High Risk of Damage: The most obvious risk is physical damage. You can easily dent, crack, bend, or completely break the workpiece.
- Incomplete Demagnetization: It’s nearly impossible to achieve full demagnetization with this method. You’ll likely be left with significant remaining magnetism.
- Unsuitable for Precision Parts: Never use this method on hardened tools, precision gauges, bearings, watch components, or any brittle materials. The risk of catastrophic failure is too high.
Method 3: AC Demagnetization
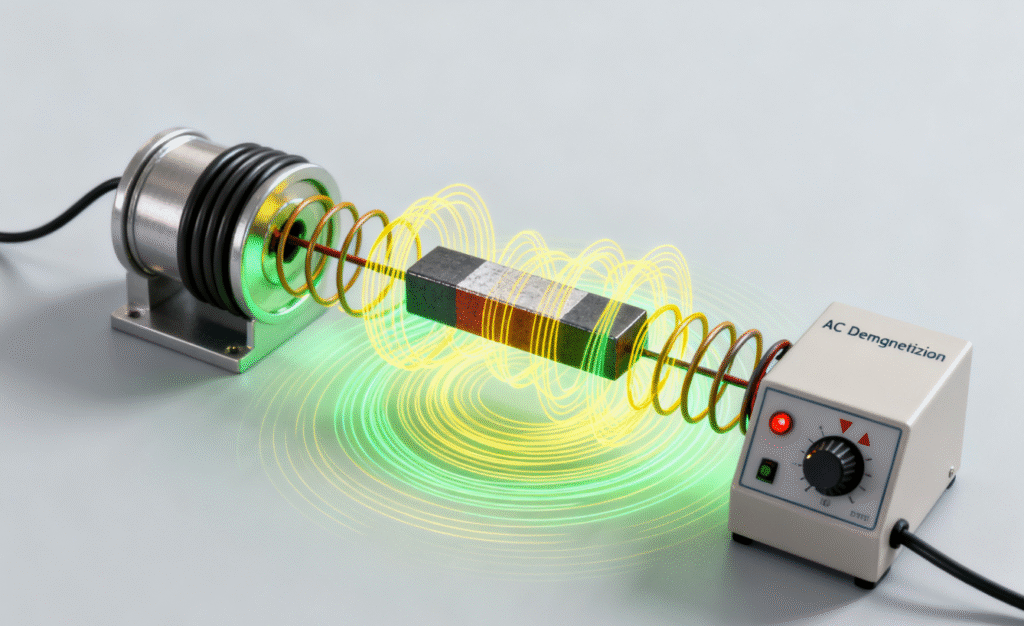
AC demagnetization is the professional standard for good reason. It’s fast, controllable, and highly effective. This makes it the go-to method for technicians, engineers, and serious hobbyists who need reliable results without damaging the workpiece.
Hysteresis Loop Reduction
This method works by applying a strong, alternating magnetic field from an AC (alternating current) coil. This field forces the magnetic domains within the material to rapidly flip their orientation back and forth, following the alternating cycle of the current.
As you slowly withdraw the part from the field, or gradually reduce the field’s strength to zero, the domains face a progressively weaker aligning force. With each cycle, fewer domains can follow the field. They’re left behind in an increasingly random state. This process effectively shrinks the material’s magnetic memory, known as its hysteresis loop, down to zero, leaving it in a neutral, unmagnetized state.
Types of AC Demagnetizers
AC demagnetizers come in various forms, each designed for specific applications. Choosing the right tool is the first step toward success. We’ve used all these types in our work and can attest to their specific strengths.
Demagnetizer Type | Principle of Operation | Best For | Precision Level | Typical Cost |
Handheld Wand | User moves the wand over and away from a stationary part. | Small tools, molds, localized spots on larger parts. | Medium to High | Low to Medium |
Plate/Tabletop | The part is passed over a flat surface containing the coil. | Small to medium-sized parts, batch processing of items like screws or bearings. | High | Medium |
Tunnel/Aperture | The part passes through the coil, often on a conveyor belt. | High-volume production, large or complex-shaped parts. | Very High | High |
A Practical Guide to Using a Wand
The handheld demagnetizing wand is one of the most versatile tools for this job. Proper use is a skill, and the withdrawal step is the most critical part of the entire process.
Here’s our proven, step-by-step process for demagnetizing a precision steel gauge block, a task where remaining magnetism is unacceptable.
- Preparation and Safety: First, clear your workspace. Remove any sensitive electronics, credit cards, mechanical watches, or storage media from the immediate area. The strong magnetic field can damage them. Put on your safety glasses.
- Initial Placement: Turn the demagnetizer on. Bring the active tip of the wand close to the surface of the gauge block. For a thorough job, you can make light contact with the part.
- The “Sweeping” Motion: Move the wand slowly and steadily across all faces of the block. We use a consistent, overlapping pattern, almost like spray-painting, to ensure the field penetrates the entire volume of the part. Don’t rush this step.
- The Critical Withdrawal: This is the step that determines success or failure. While the unit is still powered on, you must pull the wand straight away from the part. The motion must be slow, smooth, and continuous.
- Continue pulling the wand away until it’s at least three feet (or one meter) away from the part. This slow retreat allows the magnetic field to decay gradually at the part’s surface, leaving the domains randomized.
- Power Down: Only after the wand is far away from the part should you turn the power off. Turning the unit off while it’s close to the part will cause the collapsing magnetic field to give one final magnetic pulse, instantly re-magnetizing your workpiece. This is the most common mistake we see.
- Verification: Use a sensitive gaussmeter (or magnetometer) to measure the remaining magnetic field. A simple compass can also work for less critical applications. If any magnetism remains, repeat the entire process, perhaps moving more slowly during the sweeping and withdrawal phases.
Method 4: DC Demagnetization
While AC demagnetization is the most common professional method, DC demagnetization is a specialized technique used for specific, challenging applications. It’s typically found in industrial settings and requires more complex equipment.
Reversing and Decaying Field
This method uses a direct current (DC) to create a magnetic field in one direction. The current is then shut off, reversed, and applied again at a slightly lower strength. This cycle of reversing and decaying DC field is repeated multiple times.
Each cycle acts like a smaller version of the AC method, progressively reducing the material’s magnetic alignment. This step-down process carefully walks the material’s magnetic domains back to a random, neutral state.
When to Consider DC
This technique isn’t for general use but is the superior choice in certain scenarios. It’s often the method of choice when dealing with very “hard” magnetic materials or when extremely low levels of remaining magnetism are required.
We turn to DC demagnetization for:
- Materials with high coercivity. These are materials that are very difficult to magnetize but also very difficult to demagnetize with standard AC methods.
- Applications demanding exceptionally low remaining magnetism, often in the sub-gauss range, for scientific instruments or sensitive electronics.
- Processes where the demagnetization cycle must be precisely controlled, which is easier to achieve by managing DC power levels than AC amplitudes. This is often integrated into specialized industrial machinery.
Temporary Demagnetization and Shielding
Often, a user searching for how to demagnetize a magnet temporarily has a different goal in mind. They don’t want to destroy the magnet but rather to negate its effects for a specific task. The true solution for this problem isn’t demagnetization, but magnetic shielding.
“Temporary Demagnetization” vs. Shielding
True temporary demagnetization isn’t a practical physical process. Once the magnetic domains in a material are randomized, it takes significant energy to re-align them. You can’t simply flip a switch to turn a permanent magnet off and on.
What you can do is control where the magnetic field goes. This is the principle of magnetic shielding. It doesn’t eliminate the magnetic field; it simply redirects it along a preferred path, away from a sensitive area.
How Magnetic Shielding Works
Magnetic shielding works by using a material with high magnetic permeability. Permeability measures how easily a material can support the formation of a magnetic field within itself. Materials like soft iron and, most notably, mu-metal are highly permeable.
When you place a high-permeability material in a magnetic field, it acts as a “magnetic conductor.” The magnetic field lines, which are paths of magnetic force, prefer to travel through the shielding material rather than through the air or the object you’re trying to protect. The shield effectively captures the field and routes it around the sensitive component.
Practical Shielding Solutions
The application of shielding is highly practical and can be adapted to many scenarios.
- For the Watch Repairer: You need to work near a magnetized component without your steel tweezers becoming magnetized and grabbing small parts. We solve this by placing a small piece of mu-metal foil or a soft iron block (often called a “keeper”) between the magnetic source and our work area. The shield diverts the field, creating a magnetically “quiet” zone.
- For the Lab Technician: You have a sensitive sensor whose readings are being affected by a nearby motor or magnet. The solution is to enclose the sensor. We construct a simple box or cylinder from mu-metal or high-permeability steel sheet around the sensor. This enclosure, known as a Faraday cage for magnetism, intercepts the external field lines and protects the instrument inside.
- For the DIYer: A magnetized screwdriver tip keeps pulling a small steel screw sideways, making it hard to start. You can temporarily shield the screw from the shaft’s magnetism. We’ve found that wrapping the screwdriver shaft in a few layers of steel foil (aluminum foil won’t work as it’s not ferromagnetic) can weaken the field’s effect on the screw, giving you more control.
Choosing the Right Method
With several methods available, selecting the correct one is crucial for success. Your choice depends on the object you’re working with, the resources you have, and the level of precision required. This guide synthesizes the information into a clear decision matrix.
Decision Matrix for Demagnetization
Use this table to find our recommended approach based on your scenario. We’ve structured it to guide everyone from home users to industrial engineers to the most effective and safest solution.
User / Scenario | Object to Demagnetize | Recommended Primary Method | Recommended Secondary/Alternative | Key Considerations |
DIY Enthusiast | Hand tools (screwdrivers, pliers) | AC Demagnetizer (Handheld) | Striking (last resort, high risk) | AC is fast, safe for the tool, and affordable. Striking is risky and can cause damage. |
Technician / Repair | Precision parts, watch components | AC Demagnetizer (Tabletop/Wand) | Magnetic Shielding (for temporary work) | Precision is paramount. Never use heat or striking on these components. |
Lab Researcher | Experimental samples, sensor components | AC Demagnetizer (Tabletop/Wand) | Magnetic Shielding | The goal is an extremely low remaining field. Always verify results with a gaussmeter. |
Industrial Engineer | Large machined parts, bearings, molds | AC Demagnetizer (Tunnel/Aperture) | DC Demagnetization (for hard materials) | Throughput, completeness, and integration into the production line are critical factors. |
Industrial Engineer | Bulk raw steel | Thermal Demagnetization | N/A | Use this method only when metallurgical changes are acceptable or part of the process. |
Critical Safety Precautions
Working with demagnetization equipment involves powerful forces and potential hazards. Prioritizing safety is non-negotiable to protect yourself, your equipment, and anyone working nearby.
- Electrical Hazards: AC and DC demagnetizers, especially industrial units, operate on high voltage. Always inspect cords and connections for damage before use. Never operate equipment in wet conditions.
- Strong Magnetic Fields: The fields generated by demagnetizers are intense. They can and will permanently erase credit cards, ID badges, and computer hard drives. They can damage or destroy mechanical watches. Most importantly, they pose a serious risk to individuals with pacemakers or other implanted medical devices. Maintain a safe distance.
- Thermal Hazards: The thermal method involves extreme temperatures. This creates a severe risk of burns from direct contact or radiant heat. It also presents a significant fire hazard. This work must only be done in a properly equipped facility with adequate fire suppression systems.
- Mechanical Hazards: When using the striking method, there’s a real risk of eye injury from flying debris if the material chips or shatters. This method can also cause irreparable damage to the workpiece itself, rendering it useless.
Mastering Demagnetization
You now have a comprehensive understanding of how to demagnetize a magnet or, more commonly, a magnetized piece of metal. We’ve covered the science of magnetic domains and the practical application of the primary methods: controlled AC fields, intense heat, and crude mechanical shock.
We also clarified the common misconception of “temporary demagnetization,” reframing it as the highly practical technique of magnetic shielding. The right method always depends on the material, the application, and the precision you require. By following this guide, you now possess the knowledge to identify the correct approach and execute it safely and effectively, conquering the challenge of unwanted magnetism in your work.
We are a manufacturer specializing in the research and development of magnets with years of industry experience. Our product offerings include NdFeB magnets, ferrite magnets, and custom magnetic components. Our goal is to provide high-quality magnetic solutions to customers worldwide, and we also offer OEM/ODM customization services. If you have any questions about magnets or custom applications, please feel free to contact our team of experts.
Facebook
Twitter
LinkedIn
WhatsApp